I'll start this post with some information we got yesterday. We met with a guy who our neighbor had do his bathroom remodel and told him what we needed to have done. He said he could do it all, and quoted us prices lower than all the other contractors we'd gotten bids from so far. Better yet, he's not booking into late October, but could start in less than two weeks.
Today we got a LOT of stuff done. G. turned off the water to the whole house, drained the pipes, and pulled out the bathroom sink and vanity. I then pulled the rest of the drywall out, and cleaned everything up.
Meanwhile, G. was working on the kitchen. The cabinets seem to have been build AROUND the plumbing, so he had to cut them (and the countertop) out in pieces. But eventually we got everything out. The dirt and grime and...well...stinkiness was disgusting:I started by washing everything off with bleach water. G. patched up the holes with spackle and then we let it all dry.
We still had some of the BIN shellac primer left and so we were able to paint everything to seal in the grodiness ;)
And in between times, G. continued replacing outlets and light switches!
Saturday, August 30, 2008
Wednesday, August 27, 2008
More bathroom demo
G. and I both had the morning free, so we decided to squeeze in a bit more wrecking :)
While I worked on the tile around the glass block window, G. hung a curtain rod in the smallest bedroom. When I'd been up North, helping Mom pack a bit, we came across a curtain she'd bought but not used in her "old" house, so we brought it down. Then G. finished some of the ceiling-level demolition while I washed the curtain and hung it. It just makes the room look more finished:
Of course the BIG project was (almost) finishing the bathroom demo. Still waiting to turn off the water (maybe this weekend) before we can pull out the vanity and sink, but everything else is now gone! Two pictures:Nothing from the glass block people--they'd said they'd "probably" be out yesterday, but I don't have an estimate, so they weren't here yet.
Monday, August 25, 2008
Ooops...
I started the day very sore, but after some Icy Hot, some ibuprofen, and some rest, I felt much better.
Because we've gotten so far on the demolition of the bathroom, we decided to give a call to a glass block place. If we go with a full-service bathroom remodeler, then the window is just one less thing to have them do, and if we end up piecing things together, the bathroom window is one of the first things we'd need done.
After speaking with a very nice rep at the glass block piece, I determined that I'd save some money if I could get the bullnose off from around the glass block (one less thing they'd need to do). This bullnose trim was put on over a mixture of concrete and metal mesh, and it was crazy to take off, but I soon developed a method that involved smashing the ceramic tile into pieces and then chiseling off the cement. This was working great until I was at the upper left corner. I reached back to swing and my foot slipped off the rim of the tub and I went right through one of the glass blocks with the hammer.
Luckily we're replacing the window no matter what, but there's now a hole in it, and glass shards inside and outside the house.
From the outside:
From the inside--notice the lack of bullnose trim, compared to this bathroom picture:
G. came home from work and taped up the hole on the inside and the outside, too. And I called and the glass block place will be here to give us an estimate tomorrow. :)
Sunday, August 24, 2008
Bathroom's moving along!
Our electrician friend couldn't come this morning, so G. and I did some more work on our own.
He drilled some holes in the joists downstairs for wiring to be run through.
He capped two open junction boxes. One in the attic (no picture--I'm not going in the attic!), and this one in the bathroom:
He installed a new light switch in the kichen:
And he pulled out the toilet:
I just continued with the bathroom demolition.
I'm learning as I go along. The first thing I figured out is that it's easier to get the drywall off around the tub if you take the tiles off first. So I chiseled the tiles off the East wall of the tub surround, and then took the drywall down. Here's that whole wall, down to the studs:
The tile removal is still really tedious, though, so I took a break and switched to another wall. Once the toilet was gone, it was a LOT easier to get the drywall out from there, too. Another wall almost completely to the studs (except for behind the sink):
And I finished up the rest of the West wall, around the door and heating vent:
Then we did a massive cleanup, hauling out big pieces of drywall and bags of little pieces of drywall and tile, and then vacuuming. It's still not as clean as when we started, but it doesn't look so much like a war zone!
We've pretty much decided that, at some point in the very near future, we're going to just turn off the water to the whole house and then we can remove the sink and vanity in the bathroom as well as the sink and cabinets in the kitchen.
Saturday, August 23, 2008
Back to Work
After what seemed like a standstill, we got some more significant work done next door.
Our electrician friend came over again and while he and G were working inside, I weeded. It's hard to tell, but the weeds were much worse when I started. The pictures near the zucchini and tomato plants still looked awful, so I'm not including them. But this picture shows the can full of weeds I pulled. Among other things, I pulled stuff from between the sidewalk cracks (and then I sprinkled insect poison because all the weeds I pulled were crawling with earwigs. Gross).
The guys got the lights put in the kitchen and connected. It's not really possible to experience just how much better/brighter they are just by looking at a picture, but trust me when I say it's amazing!
(the other holes were from the ceiling fan--our friend had to flip the box so it's accessible from the attic now, so it can be patched--and the vent fan--which G. pulled out entirely)
The other thing they did in the kitchen was run a wire for the eventual microwave oven/range hood. That can't be put in until the cabinets are in, but it's ready (see the wire in the lower right?):
When some prior owner remodeled the bathroom, they had simply put plaster over a junction box (which was uncovered when we were doing demolition). The guys uncovered it, turned it back into a box, and left it for mounting the eventual over-vanity light:
Also in the bathroom, they moved an outlet and light switch from over the toilet to a more convenient location over the sink:
Since there were already holes in the bathroom wall, I decided to start smashing some more :)
The worst/best thing I found was under the window. The first bathroom contractor we brought in had beaten on the walls (which showed mold signs) and declared them sound. He'd said we could just overlay the tub/tile because it was fine underneath.
A friend of mine, who brought over the second contractor, knocked under the window (over the tub) and said it felt squishy. I wanted to know exactly what was behind there. The bad news is that there was mold. Not only moldy, rotten drywall, but soaking wet insulation and soaked 2x4's holding up the window, and nails so corroded that they broke when I was trying to pull them out. That's the bad news, but it's also the good news. I'm glad we decided to disregard what the first contractor said and I'm glad we found out what was behind the tile. The other good news is that, when I pulled out the soaking-wet insulation, I reached down into the opening below the tub, and that insulation is perfectly dry. In addition, I opened up the wall to the left and right of the window and that area appears to be completely fine. (It's obviously in better shape because I barely had to use the hammer to get the tiles out under the window and I had to quit because I got blistered trying to pull the tiles off beyond that!)
Here's a picture after I pulled out tiles, wet drywall and wet insulation and sprayed with mold killer:
You can see the 2x4's beyond the window and see that they look fine--and are dry.
The rest of the bathroom (what we have done so far--had to quit when we lost our babysitter!) is looking fine. Pics of that:
We still have a ways to go.
G. also installed doorstops on all the doors that needed them and helped with the bathroom demo (including hauling out the insanely-heavy bags of drywall pieces and tile pieces!).
We have another list of things to pick up from Home Depot before our friend comes back to continue some of the work.
Our electrician friend came over again and while he and G were working inside, I weeded. It's hard to tell, but the weeds were much worse when I started. The pictures near the zucchini and tomato plants still looked awful, so I'm not including them. But this picture shows the can full of weeds I pulled. Among other things, I pulled stuff from between the sidewalk cracks (and then I sprinkled insect poison because all the weeds I pulled were crawling with earwigs. Gross).
The guys got the lights put in the kitchen and connected. It's not really possible to experience just how much better/brighter they are just by looking at a picture, but trust me when I say it's amazing!
(the other holes were from the ceiling fan--our friend had to flip the box so it's accessible from the attic now, so it can be patched--and the vent fan--which G. pulled out entirely)
The other thing they did in the kitchen was run a wire for the eventual microwave oven/range hood. That can't be put in until the cabinets are in, but it's ready (see the wire in the lower right?):
When some prior owner remodeled the bathroom, they had simply put plaster over a junction box (which was uncovered when we were doing demolition). The guys uncovered it, turned it back into a box, and left it for mounting the eventual over-vanity light:
Also in the bathroom, they moved an outlet and light switch from over the toilet to a more convenient location over the sink:
Since there were already holes in the bathroom wall, I decided to start smashing some more :)
The worst/best thing I found was under the window. The first bathroom contractor we brought in had beaten on the walls (which showed mold signs) and declared them sound. He'd said we could just overlay the tub/tile because it was fine underneath.
A friend of mine, who brought over the second contractor, knocked under the window (over the tub) and said it felt squishy. I wanted to know exactly what was behind there. The bad news is that there was mold. Not only moldy, rotten drywall, but soaking wet insulation and soaked 2x4's holding up the window, and nails so corroded that they broke when I was trying to pull them out. That's the bad news, but it's also the good news. I'm glad we decided to disregard what the first contractor said and I'm glad we found out what was behind the tile. The other good news is that, when I pulled out the soaking-wet insulation, I reached down into the opening below the tub, and that insulation is perfectly dry. In addition, I opened up the wall to the left and right of the window and that area appears to be completely fine. (It's obviously in better shape because I barely had to use the hammer to get the tiles out under the window and I had to quit because I got blistered trying to pull the tiles off beyond that!)
Here's a picture after I pulled out tiles, wet drywall and wet insulation and sprayed with mold killer:
You can see the 2x4's beyond the window and see that they look fine--and are dry.
The rest of the bathroom (what we have done so far--had to quit when we lost our babysitter!) is looking fine. Pics of that:
We still have a ways to go.
G. also installed doorstops on all the doors that needed them and helped with the bathroom demo (including hauling out the insanely-heavy bags of drywall pieces and tile pieces!).
We have another list of things to pick up from Home Depot before our friend comes back to continue some of the work.
Friday, August 22, 2008
Some more demolition
Wednesday, August 20, 2008
Two Days of Work
Yesterday G. did a few things at the house to get ready for when our friend (the electrician) came today.
He took down the ceiling fan from the kitchen:
And put up the $2 cheapie light we'd picked up on clearance at the beginning of this whole remodel. It is in the living room, where there was no light:
Now the kitchen ceiling has holes for the recessed lighting when we remodel it:
(we'll need to have the ceiling patched where the exhaust and ceiling fans were.)
But most of the electrical was done downstairs. One of the conduits was removed:
And re-routed off the box that leads to the garage:
Here is the new plug:
And one outlet was roughed out in the medium bedroom:
We were left with a list of things to work on and supplies to buy before our friend comes back to do more work.
We also got one more estimate on the bathroom that was so far below all the others that I have to be missing something. This estimate was not a full package, though--this was one where we bought the stuff and he would put it in, etc. So I can't compare it exactly to the other "full service" estimates. I have to collect some other things (prices on a window, tub, toilet, sink, vanity, etc.) before I know if it's really a good deal.
Saturday, August 16, 2008
Let the demolition begin!
After puttering around and not doing much (or at least not accomplishing much) next door, we spent some time over there doing a lot of little things--and one kinda big thing ;)
I finally finished scraping the paint/tape combo off of the floor in the last bedroom. (The rest of the house is still bad, but since we're not sure what we'll do floor-wise, I'm holding off on that for awhile)
Then G. changed out all the outlets (making them three-pronged and grounded) and light switches in the bedrooms and hall:
Then I cleaned the floors (from my scraping as well as his installing--can't believe the dust, etc. that was packed into the electrical boxes!) and patched up the numerous holes in the bedroom floors (which used to have coaxial cable sticking out of them):
And then the FUN began!
We pulled out as many cabinets as we could. That meant all the high ones, and the one lower one (which had a butcher-block top). We can't remove the rest until we get a plumber to install a turn-off under the sink so we can remove the sink and then the counter and THEN the remaining cabinets.
I cannot describe what was behind/beneath/beside the butcher-blocked cabinet. OMG... I nearly gagged. All I can say is that I *hope* these are the original cabinets, because it looked like over 50 years of filth. Bleccchhhh.... We'd kind of hoped to be able to re-use the cabinets in the basement or at least the garage, but I wouldn't put a thing in them.Oh, and we also received our second estimate on the bathroom (first one came yesterday). The one today fell in the range of the one yesterday--but both are quite a bit more than we hoped to pay. Still waiting on two more...
Tuesday, August 12, 2008
Bye-Bye fence sections
G. worked really hard this morning, and got all the fence sections cut into pieces that will fit in a firepit.
In contrast, I scraped a tiny bit more paint off the floor, vacuumed some paint chips, and that's about it.
We did have one more contractor (Better Bath and Tile) come to write up an estimate for the bathroom. It'll be nice when some of these estimates actually come in! The good thing about this one is that he said typically they start bathrooms on Monday morning and are done by Friday at noon.
Monday, August 11, 2008
Little things
After several days off, G. and I did a bit of work around Mom's house.
We met with one more contractor (Building Blocks) about the bathroom and he'll give us a bid on that, as well as the drywall/framing work in the kitchen. He also had some ideas--saying we could remove as many nails as we could from the floor, and press the others down, then fill the holes and refinish the floor. Or we could even keep the nails in and go for that look. Ideas, anyway!
I also have one other contractor (Better Bath and Tile) coming sometime tomorrow to look at the bathroom.
This afternoon I scraped off all the paint/masking tape schnivels from the floor near the baseboards in the two smaller bedrooms while G. finished hanging all the doors. As soon as we hung the doors, we realized that we needed doorstops (yeah, the amount of trim we'll have to touch up is insane!), so we'll put those in tomorrow.
I'm hoping we get some estimates soon on the work that we cannot do. It's kind of frustrating to just be waiting now.
Wednesday, August 6, 2008
A last bit of work before vacation
Though we didn't get all the touch-up done (we still have to do the trim and scrape stuff off the floors), we did touch up the ceiling and walls and we removed all the tape, paper, and tarps.
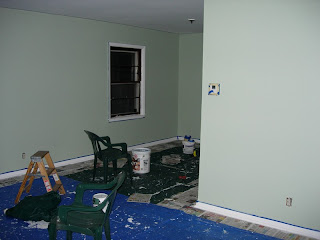
Here's the living/dining area:
Corner of the living room:
And the cedar closet in the hall:
I can't wait to see how it looks when all the windows are replaced with white vinyl!
While I was tutoring, G. fixed up the porch. He scraped off all the rusty, peely paint from the decorative metal pieces, and re-painted them with Rustoleum white paint:
The porch makes a really nice area for sitting:
Tuesday, August 5, 2008
Nothing Left but Touch-Up
The first thing we did this morning was to start peeling off the tape to see how the bedrooms turned out. We got the first bedroom done and then I started taping for the green paint. While I went to tutor, G. finished with the tape and newspaper that was down on the ground and hung the closet doors back up. It was the first time we saw the paint next to the hardwood floor--luckily, it looks really good!
Master bedroom:
Smallest bedroom:
Medium bedroom:
The only problem is on the hardwood floor near the baseboards. The masking tape and/or primer and/or baseboard paint left a mess all along the floor near the baseboards:
The good news is that it scrapes off with a razor blade. The bad news is that there's an awful lot of baseboard/floor that now needs to be scraped!
We took a break for lunch and then started with the green. We painted the hallway:
The living room:
And the dining room:
This paint is AWESOME! Or maybe the primer is awesome... The only place we've needed two coats is going over the semi-gloss used to paint the trim (I didn't tape when painting the trim, so slopped on the walls). We will need to do some touch-up (and we bumped doors and trim while moving things and the tape did take off some paint in a few areas) tomorrow, but for the most part, the house is painted!
And, finally, we cleaned up the kitchen and put away all the power tools we'd hauled over in the last two weeks.
Subscribe to:
Posts (Atom)